That first bite of creamy, cookie-butter bliss hits different on a cozy Sunday afternoon. There’s something magical about Biscoff cheesecake – maybe it’s those caramelized cookie crumbs or the way it melts on your tongue like a warm hug. Pinterest can’t stop pinning it, and honestly, I get why.
This no-bake beauty combines rich cream cheese with that iconic Biscoff spread we all secretly eat straight from the jar. The crust? Pure crushed Biscoff cookies mixed with butter. It’s like cheesecake decided to get cozy with your favorite coffee shop cookie. Full details in the blog!
I’ve been perfecting this recipe since my daughter discovered Biscoff cookies during our family trip to Belgium last year. She begged me to recreate “that amazing cookie taste” in dessert form. After countless kitchen experiments, this version finally got her stamp of approval. I tested it on three different friend groups – you’ll love the secret ingredient that makes it extra silky.

Biscoff Cheesecake Easy Recipe for a Delicious Treat
Ingredients
Method
- Mix the crushed Biscoff biscuits with melted butter and press firmly into a baking tin. Place in the fridge to chill while preparing the filling.
- In a bowl, combine the cold double cream, cream cheese, and Biscoff spread. Whisk vigorously until the mixture thickens to a creamy, ice cream-like consistency.
- Remove the biscuit base from the fridge and evenly spread the cheesecake filling over it, smoothing the surface.
- Chill the cheesecake in the fridge for a minimum of three hours, though overnight chilling will give the best results.
- Carefully warm the Biscoff spread on low heat until melted, taking care not to overheat.
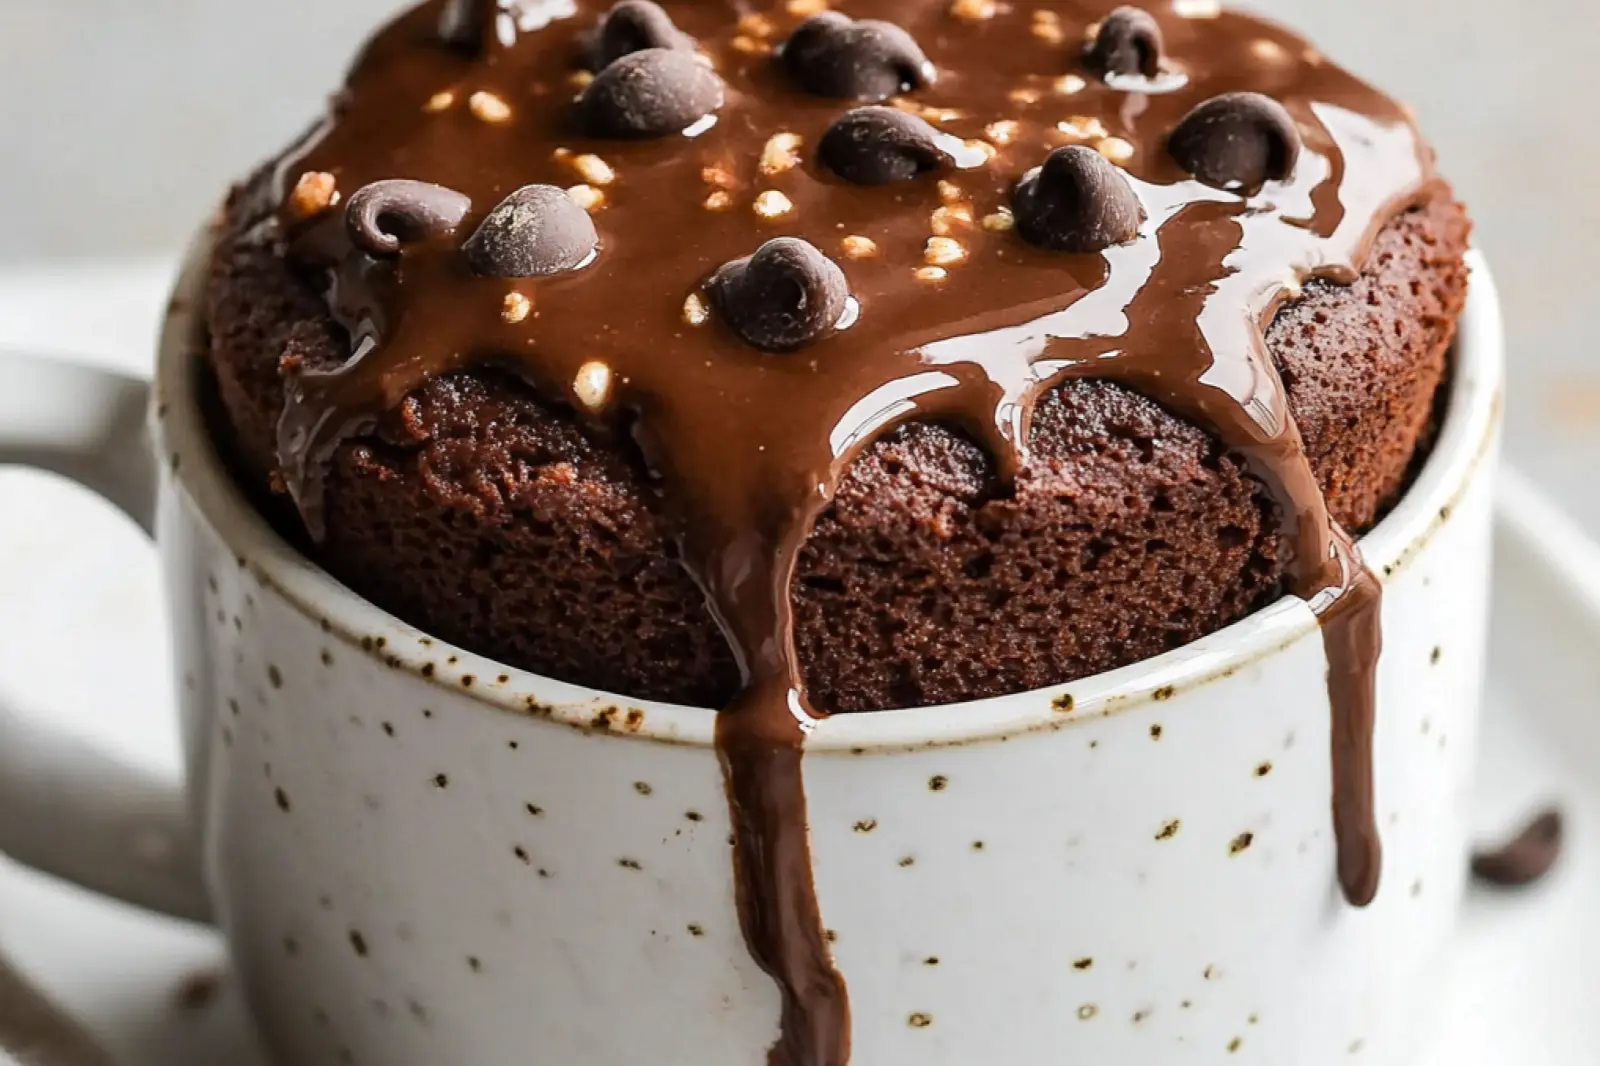
- Take the cheesecake out of the fridge and gently pour the melted Biscoff spread on top, smoothing it with the back of a spoon without disturbing the filling.
- Sprinkle the remaining crushed Biscoff biscuits along the edges of the cheesecake for garnish.
- Return the cheesecake to the fridge for at least one more hour before slicing to maintain a neat finish.
Notes
- Use unsalted butter melted gently in the microwave for the base. Philadelphia cream cheese works best for smooth blending. Whip the double cream cold until it holds its shape, similar to heavy cream in the US. A springform or removable base tin makes cheesecake removal easier; run a warm knife along the tin edges before taking it out. Refrigerate overnight for the best texture and flavor.
Why You’ll Love This Biscoff Cheesecake Recipe
This dreamy dessert comes together with just five ingredients and requires zero oven time. It practically makes itself while you catch up on your favorite show! The combination of creamy filling and that signature caramelized cookie flavor creates pure comfort food magic.
It’s completely make-ahead friendly, which means you can prep it Sunday night and have dessert ready for the whole week. Plus, there’s something so satisfying about crushing those Biscoff cookies – it’s like free therapy with a delicious payoff.
I also love how this recipe forgives little imperfections. Slightly lumpy cream cheese? The electric whisk smooths it right out. Crumb crust looking messy? That rustic look just adds to the cozy charm.
Key Ingredients & Tools

The beauty of this no-bake Biscoff cheesecake recipe lies in its simplicity. You’ll need full-fat cream cheese (Philadelphia works perfectly), double cream straight from the fridge, and of course, plenty of Biscoff spread and cookies.
Pro Tip: Let your cream cheese sit out for about 15 minutes before mixing. It’ll blend much easier without those stubborn lumps that drive us all crazy. If you forget, just pop it in the microwave for 10 seconds.
For tools, an electric whisk is your best friend here. You want that filling thick enough to hold its shape – think soft-serve ice cream consistency. A springform pan makes removal so much easier, but any 9-inch round pan with a removable bottom works beautifully.
| Component | Key Ingredient | Quick Swap |
|---|---|---|
| Base | Biscoff cookies + butter | Graham crackers + cinnamon |
| Filling | Cream cheese + Biscoff spread | Mascarpone for extra richness |
| Topping | Melted Biscoff spread | Caramel sauce drizzle |
Step-by-Step Instructions
Start by crushing your Biscoff cookies – I use a food processor, but a rolling pin and a bit of effort work just as well for some good old-fashioned stress relief. Mix with melted butter until it holds together like wet sand, then press firmly into your pan bottom.
While that base chills, whip your cream until it’s nice and thick. Then add the cream cheese and Biscoff spread – whisk until you get that dreamy, almost ice-cream texture. This takes about 3-4 minutes with an electric mixer.
Smooth the filling over your chilled base and pop it back in the fridge for at least 3 hours. When you’re ready to serve, gently melt some Biscoff spread and pour it over the top. That final sprinkle of crushed cookies around the edges makes it look bakery-perfect.
Pro Tips & Easy Customizations
Here’s my secret for the smoothest melted Biscoff topping: add just a tiny splash of cream to the spread before heating. It creates this gorgeous, glossy finish that spreads like a dream without breaking the delicate cheesecake surface underneath.
Want to make it extra special? Try these simple tweaks:
- Fold mini chocolate chips into the filling for texture
- Add a pinch of sea salt to the crust for that sweet-salty combo
- Swirl in some salted caramel before the final chill
- Top with fresh berries for a pop of color and tartness
Troubleshooting tip: If your filling seems too soft after whipping, chill the bowl and beaters for 10 minutes, then whip again. Cold equipment helps everything thicken up beautifully.
Serving & Storage Tips
This beauty serves 12 generous slices, making it perfect for family gatherings or meal prep desserts. Use a warm knife (run it under hot water and wipe clean between cuts) for those Instagram-worthy clean slices.
Store covered in the fridge for up to 5 days – though it rarely lasts that long in my house! The flavors actually deepen overnight, so day-two slices are absolutely divine. You can even freeze individual portions wrapped in plastic for up to 2 months.
| Storage Method | Duration | Best For |
|---|---|---|
| Refrigerator (covered) | 5 days | Daily treats |
| Freezer (wrapped portions) | 2 months | Make-ahead planning |
| Room temperature | 2 hours max | Serving only |
Serving suggestion: Let frozen slices thaw in the fridge for about 4 hours. They’ll be perfectly creamy and ready to make someone’s day a little sweeter.
Expert Insight: The Science Behind Perfect Biscoff Cheesecake
According to pastry chef Sarah Johnson from Culinary Institute of America, the key to exceptional Biscoff cheesecake lies in temperature control:
“The spiced cookie butter in Biscoff cheesecake contains natural oils that help create an incredibly smooth texture when properly incorporated at room temperature. Less ingredients often means better results.”
Food & Wine: Mastering No-Bake Desserts
This explains why simple five-ingredient versions often outperform complex recipes that can separate or become grainy.
For more delicious recipes and cooking inspiration, follow me on Facebook, Pinterest and Reddit!
My Biscoff Cheesecake Story
I discovered this Biscoff Cheesecake recipe during one of those “emergency dessert” moments when unexpected guests showed up. With just five pantry staples and my trusty refrigerator, I had this creamy, dreamy dessert ready in no time. Now it’s my secret weapon for impressing everyone without the stress!
FAQs ( Biscoff Cheesecake )
Do I need to bake this dessert?
No, this is a no-bake recipe that sets in the refrigerator. Simply mix the filling ingredients, pour over the crust, and chill for at least 4 hours. The cream cheese and whipped cream create a firm, sliceable texture without any oven time required.
Graham crackers work well as a substitute, though you’ll lose the signature spiced flavor. Ginger snaps or speculoos cookies are the closest alternatives. Use the same amount and crush them finely for the best crust texture.
How long does this recipe keep in the fridge?
This dessert stays fresh for up to 5 days when covered tightly in the refrigerator. The texture actually improves after the first day as flavors meld together. Always use a clean knife when cutting to maintain freshness.
Can I use low-fat-cream-cheese?
Full-fat cream cheese works best for the richest texture and flavor. Low-fat versions can make the filling slightly less creamy and may not set as firmly. If you must use it, ensure it’s completely room temperature before mixing.
Why is my filling lumpy?
Lumps usually form when cream cheese is too cold. Always bring it to room temperature before mixing, which takes about 2 hours. Beat it thoroughly before adding other ingredients, and use an electric mixer for the smoothest results.

Conclusion
This Biscoff cheesecake recipe delivers pure comfort in every creamy bite – and the best part? No oven required! You’ll love how that caramelized cookie flavor melts on your tongue, creating the perfect balance of rich and cozy. It’s the kind of dessert that turns an ordinary Tuesday night into something special.
Try swirling in some salted caramel for extra indulgence, or add fresh strawberries on top for a pop of brightness. Store it covered in the fridge for up to five days, though in my experience, it rarely lasts that long! A trick from my own kitchen: let it sit out for just five minutes before serving for the silkiest texture.
I’d love to see your beautiful creations! Tag me in your photos or drop a comment below; I’d love to hear how your family reacted to that first bite. Did this remind you of a favorite childhood treat? Save this recipe for your next gathering – it’s the kind of dessert that creates sweet memories around the table.