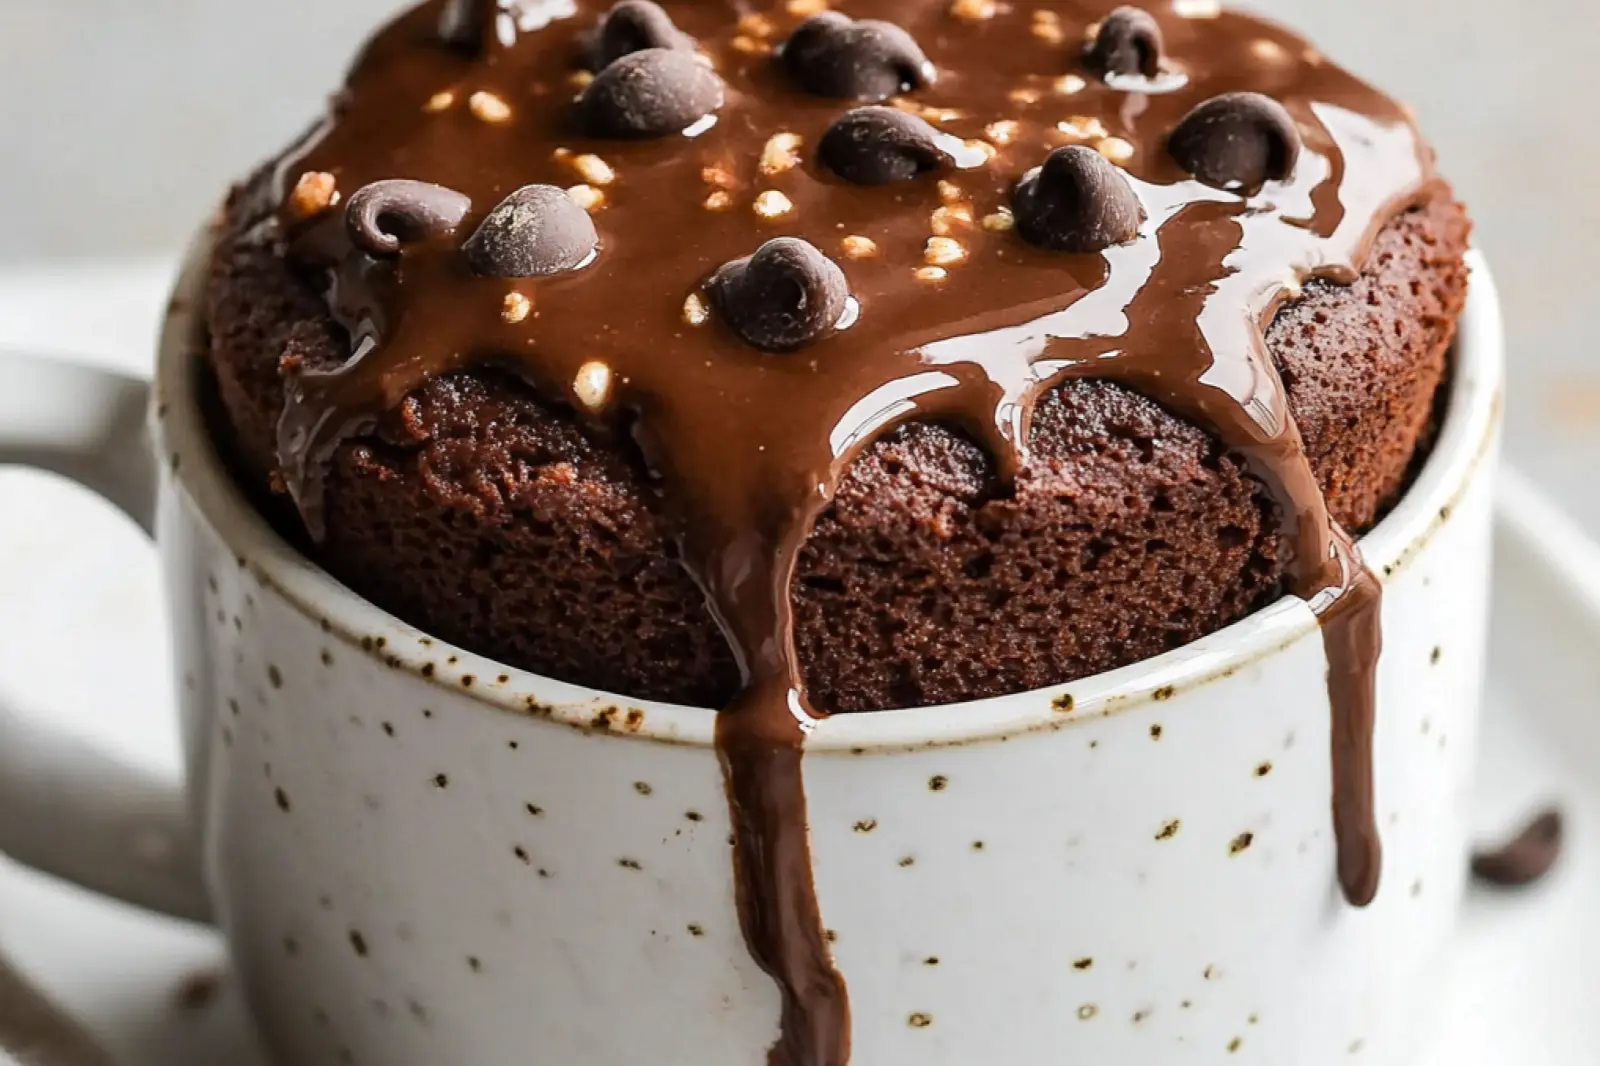
The smell of warm cocoa and vanilla hits you the second you open that oven door. Pure magic. This Matilda chocolate cake has been taking over Pinterest and TikTok for good reason – it’s ridiculously moist, wickedly chocolatey, and somehow both fancy and comforting at once.
Think of this as the chocolate cake that never lets you down. Just cocoa powder, buttermilk, and a few pantry staples create something that tastes like it came from a fancy bakery. It’s like your childhood birthday cake dreams, but way easier to pull off. Full details in the blog!
I’ve been tweaking chocolate cake recipes for years, always chasing that perfect crumb and deep chocolate flavor. After testing this version six different ways, I finally nailed the technique that makes it foolproof every single time. Trust me, I tested it. You’ll love the secret!

Matilda Chocolate Cake – Delicious Easy Best Recipe
Ingredients
Method
- Set oven to 180°C (350°F) and prepare three 7.5-inch cake pans by greasing and lining them.
- Combine milk at room temperature with white distilled vinegar in a jug and let it sit aside.
- In a large mixing bowl, whisk together flour, cocoa powder, baking powder, baking soda, salt, granulated sugar, and dark brown sugar until evenly mixed.
- In another bowl, beat the eggs then add the milk and vinegar mixture, oil, and vanilla extract; whisk until all combined.
- Pour the wet mixture into the dry ingredients and gently mix them together without overworking the batter.
- Stir in the hot coffee slowly until the batter becomes smooth and somewhat thin.
- Divide the batter evenly among the three prepared pans.
- Bake the cakes for 25 to 30 minutes or until a toothpick inserted in the center comes out clean but still with a few moist crumbs.
- Cool the cakes in their pans on the counter for 15 to 20 minutes before removing them and transferring to a cooling rack to cool completely.
- To prepare the fudge frosting, sift cocoa powder and cornstarch into a pot; add granulated sugar and a pinch of salt then whisk together.
- Gradually whisk cold milk into the mixture until fully combined and thick.
- Heat the pot over low to medium heat while whisking continuously until the mixture bubbles gently and thickens, about 8 to 10 minutes.
- Remove the pot from heat and immediately whisk in the chopped dark chocolate until melted.
- Add cold butter and stir until incorporated.
- Mix in vanilla extract; the frosting should be thick, glossy, and slightly runny.
- Allow the frosting to cool for 30 minutes at room temperature, then chill for another 30 minutes in the refrigerator until spreadable but not stiff.
- Place one cake layer on a turntable and spread a generous layer of frosting evenly on top.
- Repeat with the second layer, adding frosting, then place the final cake layer and frost the top.
- Chill the assembled cake in the fridge for 15-20 minutes to set the layers.
- Finish by covering the whole cake with the remaining frosting.
- Slice the cake and serve it with a cold glass of milk to enjoy the ultimate chocolate dessert.
Notes
- Use any neutral tasting oil for the cake batter. Check cake doneness near the end of baking by inserting a toothpick—it should come out with a few moist crumbs but no wet batter. Avoid over mixing the batter to keep the cake light and tender. Make sure the frosting has cooled and thickened properly before spreading to get the best texture. Cakes should be completely cooled before frosting, and allow the frosted layers to set before icing the outside. For a sweeter frosting, try mixing dark chocolate with semi-sweet or milk chocolate.
Why You’ll Love This Giant Chocolate Dream
This isn’t just any chocolate cakeit’s the towering, indulgent masterpiece that made us all drool watching that famous movie scene. Three layers of impossibly moist chocolate cake slathered in rich fudge frosting that’s practically begging for a tall glass of cold milk.
What I love most about this recipe is how it sneaks coffee into the batter for that deep, complex chocolate flavor without tasting like coffee at all. The buttermilk (that’s what happens when you mix milk and vinegar) keeps everything tender, while the fudge frosting cooks on the stovetop for a silky texture you just can’t get from powdered sugar versions.
Pro tip: This cake actually tastes even better the next day when all those flavors have had time to meld together. Perfect excuse to make it ahead!
Key Ingredients That Make the Magic Happen

The beauty of this Matilda chocolate cake lies in how simple pantry staples transform into something extraordinary. You’ll need unsweetened cocoa powder for that intense chocolate punchdon’t skimp here; it’s doing all the heavy lifting for flavor.
That milk and vinegar combo creates instant buttermilk, which reacts with the baking soda to give you those perfect, tender crumbs. The hot coffee might seem weird, but trust meit intensifies the chocolate without adding any coffee taste. Even my kids can’t detect it!
| Ingredient | Easy Swap | Why It Works |
|---|---|---|
| Hot coffee | Hot water + instant coffee | Enhances chocolate flavor |
| Dark chocolate | Semi-sweet or milk chocolate | Adjust sweetness to taste |
| Neutral oil | Melted butter (cooled) | Keeps cake incredibly moist |
Step-by-Step to Chocolate Heaven
Start with that milk and vinegar mixture; it’ll look a little funky when it curdles, but that’s exactly what we want. While that sits, whisk all your dry ingredients together in the largest bowl you have. This cake makes a generous amount of batter!
The key to perfect texture is gentle mixing. Combine your wet ingredients separately first, then fold them into the dry ingredients until just barely combined. When you add that hot coffee, the batter will look alarmingly thindon’t panic, that’s normal and exactly right.
Timing note: These layers need a full 25-30 minutes in the oven. Check with a toothpick toward the endyou want just a few moist crumbs clinging to it, not wet batter.
Pro Tips for Frosting Success
The stovetop fudge frosting is what makes this cake special, but it requires a little patience. Keep that heat at medium-low and whisk constantly; rushing this step leads to lumpy frosting that nobody wants.
When it starts to thicken and bubble gently, that’s your cue to remove it from heat and add the chocolate. The residual heat will melt everything perfectly. Then comes the waiting gamethis frosting needs time to cool and thicken before you can spread it.
- Test for readiness: The frosting should coat a spoon but still be spreadable
- Too runny? Pop it back in the fridge for 15 more minutes
- Too stiff? Let it sit at room temperature and give it a gentle stir
Serving and Storage Like a Pro
This showstopper cake serves about 12 people generously, though I’ve seen smaller crowds make quick work of it. Serve with that obligatory glass of cold milkit’s not just nostalgic, the cool milk balances the rich chocolate perfectly.
Store covered at room temperature for up to 3 days, or wrap individual slices and freeze for up to 3 months. The cake actually improves after a day as the flavors settle and the crumb becomes even more tender.
Make-ahead hack: Bake the layers a day early and wrap them well. Make the frosting the day you plan to assembleit’ll be easier to work with when fresh.
Expert Insight: The Science Behind Perfect Chocolate Cake
According to pastry chef and food scientist Dr. Ali Bouzari, the secret to an exceptional Matilda chocolate cake lies in proper cocoa bloom and moisture retention:
“Using both cocoa powder and melted chocolate creates depth, while the addition of hot coffee intensifies the chocolate flavor without making it taste like coffee. The key is balancing fat content with acidity for that perfect tender crumb.”
The Food Lab: Better Home Cooking Through Science
This explains why the best versions of this beloved cake achieve that impossibly moist, rich texture that made it famous.
For more delicious recipes and cooking inspiration, follow me on Facebook, Pinterest and Reddit!
My Personal Story
When my daughter first watched Matilda, she begged me to recreate “that amazing chocolate cake” from the movie. After countless kitchen experiments, I finally nailed this matilda chocolate cake recipe that’s so rich and fudgy, it actually lives up to the film’s hype. Now it’s our go-to celebration cake!
FAQs ( matilda chocolate cake )
Can I make this cake without buttermilk?
Yes, you can substitute buttermilk easily. Mix 1 cup regular milk with 1 tablespoon white vinegar or lemon juice, then let it sit for 5 minutes. This creates the tangy acidity needed for proper rise and texture in this recipe.
How do I know when the cake is fully baked?
Insert a toothpick into the center – it should come out with just a few moist crumbs, not wet batter. The cake will also start pulling slightly from the pan sides. Usually takes 28-32 minutes at 350F for standard 9-inch pans.
Can I freeze this chocolate dessert?
Absolutely! Wrap cooled cake layers tightly in plastic wrap, then foil. Freeze up to 3 months. Thaw overnight in the refrigerator before frosting. The texture stays perfectly moist when properly wrapped.
What makes this recipe so moist?
The combination of hot coffee, buttermilk, and oil creates incredible moisture. Coffee enhances the chocolate flavor without tasting like coffee. Oil keeps it tender longer than butter would in easy baking recipes desserts.
Should I use Dutch-process or regular cocoa powder?
Either works well, but Dutch-process gives a richer, deeper chocolate color and flavor. If using regular cocoa, the cake will be slightly more acidic and lighter in color. Both produce delicious results with this tested recipe.

Conclusion
This Matilda chocolate cake delivers that perfect balance of rich chocolate flavor and tender crumb that makes everyone go quiet on the first bite. The stovetop frosting technique creates a silky texture that’s worth every minute of whisking. You’ll love how it turns outimpressively tall, deeply chocolatey, and surprisingly foolproof once you nail the timing.
The cake keeps beautifully covered for three days, and honestly tastes even better on day two. Here’s a trick I learned from testing this recipe six timeslet the frosting cool completely before spreading for the cleanest layers.
I’d love to see your towering chocolate creations! Share a photo and tag usthere’s something magical about seeing this cake come together in kitchens everywhere. Did this recipe remind you of any special birthday memories? Save this one for your next celebration, and don’t forget to pour that glass of cold milk. Pure childhood bliss in every bite.